

Gabriel,
the shell looks fantastic with the CF wing. I'm really looking forward to seeing what Magic you're going to pull out of your hat with the interior.
Joel


Go to automodeler.com for the current dynamic site!
The Garage
For general automotive modeling or non-modeling topics.
For general automotive modeling or non-modeling topics.
Hosted by Jim Starkweather
Porsche campaign anyone?

Joel_W

Joined: December 04, 2010
KitMaker: 11,666 posts
Auto Modeler: 2,974 posts

Posted: Monday, December 03, 2018 - 01:22 PM UTC

Joel_W
Joined: December 04, 2010
KitMaker: 11,666 posts
Auto Modeler: 2,974 posts
Posted: Monday, December 03, 2018 - 01:24 PM UTC
Quoted Text
Cripes, I step out of the country for a week and Gabriel has painted and repainted his car seven times, fitted decals front and back, but in what should the simpler decision, can't decide what colour the interior should be!
Great looking Porsche Gabriel. I think the bronze carbon weave looks spectacular with the gloss black. You've taken this to new heights!
Meanwhile I have begun the process of applying the more than 60 decals to the 934. Should be done by the weekend and then my moment of truth, a first gloss coat.
Actually I should say building a race car is a good first way to get into car building. Those decals sure can hide a lot of small issues.
cheers
Michael
Michael,
You've discovered that Gabriel can work wonders in short order.
I'm looking forward to seeing your 934 all dressed up in it's decals.
Joel

Szmann

Joined: September 02, 2014
KitMaker: 1,977 posts
Auto Modeler: 1,371 posts

Posted: Monday, December 03, 2018 - 02:37 PM UTC
Quoted Text
Quoted TextCripes, I step out of the country for a week and Gabriel has painted and repainted his car seven times, fitted decals front and back, but in what should the simpler decision, can't decide what colour the interior should be!
Great looking Porsche Gabriel. I think the bronze carbon weave looks spectacular with the gloss black. You've taken this to new heights!
Meanwhile I have begun the process of applying the more than 60 decals to the 934. Should be done by the weekend and then my moment of truth, a first gloss coat.
Actually I should say building a race car is a good first way to get into car building. Those decals sure can hide a lot of small issues.
cheers
Michael
Michael,
You've discovered that Gabriel can work wonders in short order.
I'm looking forward to seeing your 934 all dressed up in it's decals.
Joel
Thanks, Michael and Joel
This time Gabriel worked the biggest wonder at all: he redesigned the Porsche but seems that nobody likes his visionary styling
 :
:
Oh, boy! I've done it! I was only half way happy with the last 2K coat and I decided to sand it slightly and apply a last one. I tried 3000 grit sponge and... nothing! The resin is so hard, the sponge just squeal haplessly on the surface. One has to press like a madman to leave some minute scratches, let alone polish properly. I took then to my Proxxon and my Novus 2 and try it out. 5000 rpm - nothing. Only at 8000 rpm some results started to show and at 9000 rpm it actually worked. So I went polishing the surface all about. One or twice my Proxxon kicked and the metallic shaft touched the model - not a scratch! (I'm falling completely for this 2K thing). After some serious polishing, I went to the paint booth - now the finish was smoother but somewhat hazy - nonetheless I could see the reflection of my dumb face in it. I applied a wet coat of 2K - it was all I need it and looked fantastic. Then I have noticed on the bonnet a lot of "pimples" of half dried resin or something; perhaps when I sprayed the pillars I over-sprayed the bonnet or something like that. So I had a beautiful car - mirror finish - with an ugly bonnet. I remembered then that - when I was fixing boats - we were using heat gun to level out and to degass the resin. So i took the heat gun and started flashing the resin. It worked! The resin on the tip of the bonnet started leveling out as under a charm. Focused on the operation, I didn't noticed I went to close to the car's body and - suddenly - the A pillar in the right side collapsed. No warning, no smell, nothing! Just twisted in a fraction of a second!
Well, now I have a beautiful "crashed" body for a diorama
:
Ironically, I cannot even rust the thing, because it was made from aluminum and fiber!
So! What now?
Well, another build, of course!
The only problem is I have no other Porsche since I bought this only one for the GB. To my bitterness, I completed and sent my last order before my return from Europe just the night before! Oh, well...
The only kit from my stash (the incoming order counted in) that has anything to do with Ferdinand Porsche is Tamiya's New Beetle which I started already.
Because I don't want to let you alone, I will keep posting my build here, in a hors concours race.
UPDATE - new beginning
The kit from Tamiya is the poorest in terms of quality and engineering I ever had from them. The molding is good - no flash at all, but the haste in releasing this kit is obvious:

My best guess is that this kit is improvised from other kits. Inside the tires is stamped "TOYOTA" and the bottom pan seems to be re-worked from another master.
The body shell is quite nice and the parting lines smartly disguised in the design lines. Still some bits needed to be cleaned up:

The panel lines are also too shalow and I rescribed all of them - fortunately are just a few:

Probably the worst of all is the yellow plastic. I had to use black primer just to block the translucency of the plastic - otherwise I'll never get a decent paint job on it because of refraction (optical contamination I shall say):

His is something which I normally I don't do, but I try to regain the lost time - and I need badly to block that yellow:

The kit has no engine and actually doesn't need one since the bonnets don't open and this huge shield covers it from underneath:

The interior is "bathtub" type without door cards - I think Tamiya is the last company to do so, unfortunately. The detail is soft, unfortunately, especially on the doors and rear seats and it's going to be a nightmare to paint because the exterior color covers much of the rear panels and dashboard...

The dashboard is nicely molded but as a single piece, pedals included, making the painting and detailing difficult:

Preliminary conclusions: I'm not very happy with the detail and the general engineering - definitely not a typical Tamiya. On the other hand, the short parts count might help me regain the lost ground... to be seen!
Cheers!
Gabriel

Joel_W
Joined: December 04, 2010
KitMaker: 11,666 posts
Auto Modeler: 2,974 posts
Posted: Tuesday, December 04, 2018 - 01:31 AM UTC
Gabriel,
A nightmare for sure. Believe me when I say that I feel your paint, frustration, & sense of loss. I've been there many times for numerous mistakes both by me and even worse the manufacture. Look at it this way, at least you weren't working on the real car that you bought for your dream sports car.
I owned a brand new 1969 VW Beatle after the traffic court judge convinced my father to not let me drive my beloved MGB on the road as it was more race car then street car, and drive it on the track. Well, the Bug experiment didn't last more then 6 months, as it sure wasn't a girl magnet, and none of my buddies wanted it parked near their MGAs & Bs. So I traded it in for a used 1967 MG Midget, which is another long and very colorful story. For now just imagine a Midget with a duel side draft two barrel Webber carb, and a custom made exhaust header, Abarth exhaust, and that was just the start of it modifications.
This campaign I believe runs for till 1/1//20, so you have plenty of time before your vacation to order and start a kit that you're really interested in, then finish it up if necessary when you get back from vacation.
the Tamiya Bug sure doesn't sound like much of a fun nor interesting build, and it's certainly no Porsche. Yep, Dr. Porsche designed the original VW prior to WWII, so technically it does fit the campaign's scope.
One thing I do use for tough finish prep work, is the full range of Tamiya sponges: 1,000, 1,500, 2,000, & my favorite 3,000. I do believe that they make 800 emery cloth, but I've never found it in any auto store as yet.
I wish I could have been more help with the 2K venture, but I've stuck to my 1st love Mr. Hobby Lacquer Super Gloss as it's so much easier to use, and certainly way cheaper.
Joel
Szmann
Joined: September 02, 2014
KitMaker: 1,977 posts
Auto Modeler: 1,371 posts
Posted: Tuesday, December 04, 2018 - 02:15 AM UTC
Quoted Text
This campaign I believe runs for till 1/1//20, so you have plenty of time before your vacation to order and start a kit that you're really interested in, then finish it up if necessary when you get back from vacation.
the Tamiya Bug sure doesn't sound like much of a fun nor interesting build, and it's certainly no Porsche. Yep, Dr. Porsche designed the original VW prior to WWII, so technically it does fit the campaign's scope.
Joel, I was pushing this build too hard and too far from the good beginning and I knew all along the disaster is looming - so did'n really came as a shock for me.
Yet the experiences are valuable and I'm going to apply them right away, on the Beetle. Guess what! The New Beetle is going to be copper with copper weave CF roof
Also I am thinking to some CF interior inserts.VW Beetle is a fun car, but not a performance car for sure! My father owned a Fiat 850 (the same concept as the original Beetle) and it was a real hazard during the winter
Although Bettle and Porsche stem from the same design, the New Beetle is a completely different thing. It is built on Golf platform, has a front mounted engine; only the body is reminiscent of the original design. That's why I don't think is a legitimate build for the GB, yet I'm posting here just to maintain continuity and to prove (hopefully) that my experiments were not in vain.
There is time for a build in four months, but my time is commited somewhere else: I have to finish my EIndekker before the end of December, then I have to try and finish a T-44 full interior before I go - and this is a little too hard already. To be seen.
Until we see how my projects will develop, I'm following with much interest Michael's build - he reached the tipping point too - and, of course, yours!
Cheers!
Gabriel
Joel_W
Joined: December 04, 2010
KitMaker: 11,666 posts
Auto Modeler: 2,974 posts
Posted: Tuesday, December 04, 2018 - 07:53 AM UTC
Quoted Text
Quoted Text
This campaign I believe runs for till 1/1//20, so you have plenty of time before your vacation to order and start a kit that you're really interested in, then finish it up if necessary when you get back from vacation.
the Tamiya Bug sure doesn't sound like much of a fun nor interesting build, and it's certainly no Porsche. Yep, Dr. Porsche designed the original VW prior to WWII, so technically it does fit the campaign's scope.
Joel, I was pushing this build too hard and too far from the good beginning and I knew all along the disaster is looming - so did'n really came as a shock for me.
Yet the experiences are valuable and I'm going to apply them right away, on the Beetle. Guess what! The New Beetle is going to be copper with copper weave CF roof
VW Beetle is a fun car, but not a performance car for sure! My father owned a Fiat 850 (the same concept as the original Beetle) and it was a real hazard during the winter
Although Bettle and Porsche stem from the same design, the New Beetle is a completely different thing. It is built on Golf platform, has a front mounted engine; only the body is reminiscent of the original design. That's why I don't think is a legitimate build for the GB, yet I'm posting here just to maintain continuity and to prove (hopefully) that my experiments were not in vain.
There is time for a build in four months, but my time is commited somewhere else: I have to finish my EIndekker before the end of December, then I have to try and finish a T-44 full interior before I go - and this is a little too hard already. To be seen.
Until we see how my projects will develop, I'm following with much interest Michael's build - he reached the tipping point too - and, of course, yours!
Cheers!
Gabriel
Gabriel
I do see your point about the new Bug vs the old Bug. Funny you should mention the Fiat 850. Back in the mid 70s my oldest friend bought a used Fiat 850, and wanted to use it for some time trials, etc. So we tweaked the engine some, and did a lot of suspension work to really stiffen it up. Well, the front shocks were attached to the pressed chassis, and slowly but surely pushed up the mounting plates. We had to reposition them and then add stiffener plates. Worked to some degree.
Looking forward to seeing your Bug build progress for sure.
Joel

Cosimodo

#335

Joined: September 03, 2013
KitMaker: 1,808 posts
Auto Modeler: 701 posts

Posted: Tuesday, December 04, 2018 - 09:49 PM UTC
Ah Gabriel,
So sorry to read of your misfortune. I think some plastics are like that i.e. no warning that the tipping point has been reached. They don't soften gently but just collapse. It may yet be good for a street scene diorama set in Paris. Just add a few figures in yellow vests
A copper VW with carbon fibre highlights! I am sure that somewhere someone has one of those. i am looking forward to your version.
cheers
Michael
Szmann
Joined: September 02, 2014
KitMaker: 1,977 posts
Auto Modeler: 1,371 posts
Posted: Wednesday, December 05, 2018 - 01:10 AM UTC
Quoted Text
So sorry to read of your misfortune. I think some plastics are like that i.e. no warning that the tipping point has been reached. They don't soften gently but just collapse. It may yet be good for a street scene diorama set in Paris. Just add a few figures in yellow vests
A copper VW with carbon fibre highlights! I am sure that somewhere someone has one of those. i am looking forward to your version.
I keep thinking that the copper paint stored the heat actually and released it when was "saturated". It acted more the way the metals melt, not the plastic. Anyhow, it doesn't make much difference now...
When comes about beetles, you find everything out there. Their affordability and constructive simplicity made them an all time favorite for custom shops
I don't have a specific one in mind but, as you said, it might be one lurking somewhere out there Cheers!
Gabriel
Cosimodo
#335
Joined: September 03, 2013
KitMaker: 1,808 posts
Auto Modeler: 701 posts
Posted: Saturday, December 08, 2018 - 03:25 PM UTC
A long week of applying decals. I had hoped that it wouldn't be too bad given they were Cartograf rather than Tamiya usual decals but the complex curves of the Porsche caused plenty of headaches. Still a couple of bits too finalise behind the rear wheel arch.


Still a bit of clean up also required for the liberal use of decal softener.
Last question before I take the big leap with the clear coat. Do you install the "glass" and clear coat that or do that after?
cheers
Michael
Still a bit of clean up also required for the liberal use of decal softener.
Last question before I take the big leap with the clear coat. Do you install the "glass" and clear coat that or do that after?
cheers
Michael
Joel_W
Joined: December 04, 2010
KitMaker: 11,666 posts
Auto Modeler: 2,974 posts
Posted: Sunday, December 09, 2018 - 03:21 AM UTC
Michael.
Just a great job on the decaling. I'm super impressed.
I love Cartograf decals, and hate Tamiya's as their thickness makes them a nightmare, but for those few times I need to use them, my choice of decal solutions is Mr. Hobby's Mr. Mark Setter, and Mr. Mark Softner. They will literally work on the most difficult decals, but destroy thinner ones for sure.
As for your clear coats, the glass gets installed after not before. If there are scratches that need to be taken care of, do all of that work off body.
Looking forward to your next update.
Joel
Joel_W
Joined: December 04, 2010
KitMaker: 11,666 posts
Auto Modeler: 2,974 posts
Posted: Sunday, December 09, 2018 - 09:01 AM UTC
Just a quick note that I just posted my latest update in the main Car section of the site.
I finished up painting the chassis, and started on the cockpit with some major corrections.


Joel
I finished up painting the chassis, and started on the cockpit with some major corrections.
Joel
Szmann
Joined: September 02, 2014
KitMaker: 1,977 posts
Auto Modeler: 1,371 posts
Posted: Monday, December 10, 2018 - 01:20 AM UTC
Michael, very good work on those decals for sure. Yes, Cartograf are about the best in the world at this time and Tamiya, Airfix, Special Hobby add them to their packages.
The glazed surfaces are the last ones to be added to the model - as Joel mentioned already - because they are very susceptible to staining / scratching during the final stages of bodywork.
You haven't mentioned what clear you're going to apply - I hope you are aware that some clears are very hot and can shot your decals.
KUTGW!
Gabriel
Szmann
Joined: September 02, 2014
KitMaker: 1,977 posts
Auto Modeler: 1,371 posts
Posted: Monday, December 10, 2018 - 01:24 AM UTC
Joel only now I became aware of the lack of detail on the bottom side of the kit. I know they were aerodynamic clean, yet...
As usual, good care for details that should teach us something
Gabriel
As usual, good care for details that should teach us something
Gabriel
Joel_W
Joined: December 04, 2010
KitMaker: 11,666 posts
Auto Modeler: 2,974 posts
Posted: Monday, December 10, 2018 - 02:54 AM UTC
Quoted Text
Joel only now I became aware of the lack of detail on the bottom side of the kit. I know they were aerodynamic clean, yet...
As usual, good care for details that should teach us something
Gabriel
Gabriel,
Yep. The smoother the bottom tray & tunnels, the easier it is to move the incoming air out through the rear end, and at the same time create some down force as well.
Joel
Cosimodo
#335
Joined: September 03, 2013
KitMaker: 1,808 posts
Auto Modeler: 701 posts
Posted: Monday, December 10, 2018 - 08:48 PM UTC
Quoted Text
Michael.
Just a great job on the decaling. I'm super impressed.
I love Cartograf decals, and hate Tamiya's as their thickness makes them a nightmare, but for those few times I need to use them, my choice of decal solutions is Mr. Hobby's Mr. Mark Setter, and Mr. Mark Softner. They will literally work on the most difficult decals, but destroy thinner ones for sure.
As for your clear coats, the glass gets installed after not before. If there are scratches that need to be taken care of, do all of that work off body.
Looking forward to your next update.
Joel
That's just what I needed to know. Thanks Joel. I have my Gravity gloss kit ready to go with with the various polishes. So in the next few days it should be done.
cheers
Michael
Cosimodo
#335
Joined: September 03, 2013
KitMaker: 1,808 posts
Auto Modeler: 701 posts
Posted: Monday, December 10, 2018 - 08:50 PM UTC
Quoted Text
Michael, very good work on those decals for sure. Yes, Cartograf are about the best in the world at this time and Tamiya, Airfix, Special Hobby add them to their packages.
The glazed surfaces are the last ones to be added to the model - as Joel mentioned already - because they are very susceptible to staining / scratching during the final stages of bodywork.
You haven't mentioned what clear you're going to apply - I hope you are aware that some clears are very hot and can shot your decals.
KUTGW!
Gabriel
Hi Gabriel, I am going to use the Gravity gloss mix. Thanks for the warning. there are some decals left over so I might try it out on the underside of the car and make sure I don't cook them.
cheers
Michael
Joel_W
Joined: December 04, 2010
KitMaker: 11,666 posts
Auto Modeler: 2,974 posts
Posted: Tuesday, December 11, 2018 - 03:02 AM UTC
Quoted Text
.
That's just what I needed to know. Thanks Joel. I have my Gravity gloss kit ready to go with with the various polishes. So in the next few days it should be done.
cheers
Michael
Michael,
The Gravity Clear Coat kit is a 3 part 2K system. Our resident expert with 2K is Gabriel. I'm still old school and am using Clear Gloss Lacquers, as I'm very comfortable with working with them.
I'm really looking forward to seeing how your glossing turns out.
Joel
Szmann
Joined: September 02, 2014
KitMaker: 1,977 posts
Auto Modeler: 1,371 posts
Posted: Tuesday, December 11, 2018 - 10:44 AM UTC
Michael, 2K is pretty safe as it has only +/- 25% reducer (thinner). Well, I'm looking forward to a good result, since 2K is the best clear coat yet! (from my experience at least)
UPDATE
With the body still in prolonged works, I started working the "bathtub". Overall disappointing detail from Tamiya, but could have been worst:

Everything was primed with black just to block the sick yellow underneath, then I sprayed the metal parts with exterior color (Rust-oleum copper), masked them off, and sprayed the first interior color. And that was the surprise of the evening! I chose Radar display grey #2 from Tru-Color Paints range which seemed to be about the right tone. What I didn't expect was the color to be slightly metallic (some sort of pearl I guess). All the better! Under the satin coat will look just like cheap plastic (vinyl):

The metallic effect much better visible on the seats:

After some thought, I decided the silver chrome isn't the right color for the wheels and I sprayed Alclad Pale Gold straight over the kit's chrome:

However much I try, I just cannot endear the Tamiya paints. I've got here a decent result with Tamiya Smoke but I had to struggle a lot:

The windshield has a couple scratches straight from the bag, as the piece was broken off from the sprue. A bath of Pledge Floor Polish is necessary now.

The lateral windows need exterior painting as well, but Tamiya didn't bother to offer masks for that as well so I'm going to cut the masks myself "canopy style":

The underside parts were painted and detailed as well, but still wet from clear coating and I didn't want to touch them and expose to dust - in the next update.
Cheers!
Gabriel
UPDATE
With the body still in prolonged works, I started working the "bathtub". Overall disappointing detail from Tamiya, but could have been worst:
Everything was primed with black just to block the sick yellow underneath, then I sprayed the metal parts with exterior color (Rust-oleum copper), masked them off, and sprayed the first interior color. And that was the surprise of the evening! I chose Radar display grey #2 from Tru-Color Paints range which seemed to be about the right tone. What I didn't expect was the color to be slightly metallic (some sort of pearl I guess). All the better! Under the satin coat will look just like cheap plastic (vinyl):
The metallic effect much better visible on the seats:
After some thought, I decided the silver chrome isn't the right color for the wheels and I sprayed Alclad Pale Gold straight over the kit's chrome:
However much I try, I just cannot endear the Tamiya paints. I've got here a decent result with Tamiya Smoke but I had to struggle a lot:
The windshield has a couple scratches straight from the bag, as the piece was broken off from the sprue. A bath of Pledge Floor Polish is necessary now.
The lateral windows need exterior painting as well, but Tamiya didn't bother to offer masks for that as well so I'm going to cut the masks myself "canopy style":
The underside parts were painted and detailed as well, but still wet from clear coating and I didn't want to touch them and expose to dust - in the next update.
Cheers!
Gabriel
Joel_W
Joined: December 04, 2010
KitMaker: 11,666 posts
Auto Modeler: 2,974 posts
Posted: Tuesday, December 11, 2018 - 12:21 PM UTC
Gabriel,
Great progress for sure.
The interior tub and seats really look quite good, as does that Gold wheels. They'll really standout in a crowd for sure.
As for the glass and the Tamiya Smoke, I'd say you did pretty darn good. The Tamiya Smoke seems to me to be a more translucent color so the base exhaust color can show through.
Joel
Szmann
Joined: September 02, 2014
KitMaker: 1,977 posts
Auto Modeler: 1,371 posts
Posted: Wednesday, December 12, 2018 - 02:32 AM UTC
Quoted Text
Gabriel,
Great progress for sure.
The interior tub and seats really look quite good, as does that Gold wheels. They'll really standout in a crowd for sure.
Thank you, Joel! The original car's interior isn't complicated at all to start with, but Tamiya took care to virtually obliterate any inside door detail. I don't understand why they systematically refuse to do door cards as the other manufacturers do, although will be easier and for the molding process and for the modeler to pick up details.
Quoted Text
As for the glass and the Tamiya Smoke, I'd say you did pretty darn good. The Tamiya Smoke seems to me to be a more translucent color so the base exhaust color can show through.
I am content with the way it came out, but I still don't like the way these paints work. They have a gooey consistence once diluted with their own thinner X20A - it just feels like trying to spray honey. I never managed to achieve a constant "easy" flow from my small settings airbrushes unless I diluted them with lacquer thinner but here I didn't want to use lacquer for fear of not staining the glass by accident. Yes, the transparency is a nice effect and that was the only reason I chose this paint - otherwise I would have used my much better black Liquitex acrylic. I need that transparency to contrast with the outside satin black frame, otherwise all the effort is lost
UPDATE
The best and most motivating moment in a build is the one when all the previously meticulously painted parts finally fall together and the whole assembly come to life!
The exhaust line installed:

This is all that Tamiya has to offer as the engine for this kit. I try to give it a "sporty" look, although not much can be spied under the shield:

I don't know what you call that cross rod - it looks awkward and I guess is a movement limiter (?)

... and that's the whole of it! It might be that I am going to come back with some dry-brushing and some metallic accents...

The interior is also almost finished. I did my best to paint the second color with a brush, then detailed the seats:

I still have to add the parking brake, the shifter, the back seats headers and the dashboard, (some of them pre-painted already) but the main effort is complete:

Cheers!
Gabriel
Joel_W
Joined: December 04, 2010
KitMaker: 11,666 posts
Auto Modeler: 2,974 posts
Posted: Wednesday, December 12, 2018 - 03:56 AM UTC
Gabriel,
talk about flying through a build. What you accomplished in one session would take me a full week, and I'm retired!
The finished chassis pan & exhaust system is perfect, & brand spanking new. The bottom of the engine pan will do to fool ones eye that a engine sits on top of it.
I really like what you've accomplished with the interior tub. VW should see just how good their basic tub can look with a little contrasting colors.
As for the suspension bar question, it's called either a front or rear Sway bar, or anti-roll bar. it's used to control the amount of sway from corner to corner during turn in.
Joel
Szmann
Joined: September 02, 2014
KitMaker: 1,977 posts
Auto Modeler: 1,371 posts
Posted: Sunday, December 16, 2018 - 11:34 AM UTC
Quoted Text
Gabriel,
As for the suspension bar question, it's called either a front or rear Sway bar, or anti-roll bar. it's used to control the amount of sway from corner to corner during turn in.
Thanks, Joel. Either is Tamiya engineering, either the VW simplicity that makes the sway bar look very awkward on this model.
UPDATE
I had some difficulties trying to decide myself how to apply the color scheme on the dash, keeping it simple but joining all the graphic elements in the same time, and this is what I came up with:


The parking brake and the shifter installed:

Tamiya decals are very stiff as we know. Here after two applications of Microsol it is starting to wrap around contour - eventually I solved the problem with Tamiya Mark Fit Strong

I have applied a very light wash to the interior in attempt to accentuate some details. I haven't accomplished too much, but it is better still than before:

Same treatment applied to the underside, with the same marginal results, but it's exactly what I was after - I didn't want a too weathered buggie (I apologize for this picture quality - only now that I've noticed it's slightly out of focus
 ):
):
Another speed bump I hit is related to the windows. Tamiya offers pre-cut masks but apparently the one for the rear window it is slightly smaller than it should be. When I applied it, I aligned it to one edge, just to discover after spraying with black that the clear center appears a little offset. Not big deal on the window alone - barely noticeable - but once installed on place and with the pillar C covering half of the black surface, my window looked offset quite badly, some three inches if translated to 1:1 scale. I have stripped the paint with Clorox and now I am about to cut my own mask and re-do the black interior frame.
Cheers!
Gabriel
Joel_W
Joined: December 04, 2010
KitMaker: 11,666 posts
Auto Modeler: 2,974 posts
Posted: Monday, December 17, 2018 - 05:02 AM UTC
Gabriel,
Now that's some dashboard. Talk about fancy.
The weathering, especially in the interior really looks quite good.
It's kind of surprising that Tamiya's mask issues weren't corrected before they had them made.
Joel
Now that's some dashboard. Talk about fancy.
The weathering, especially in the interior really looks quite good.
It's kind of surprising that Tamiya's mask issues weren't corrected before they had them made.
Joel
Joel_W
Joined: December 04, 2010
KitMaker: 11,666 posts
Auto Modeler: 2,974 posts
Posted: Monday, December 17, 2018 - 09:27 AM UTC
Just a quick note to let everyone know that I've just posted my latest update in my build blog located in the car forum. Here's a few pictures to give you an idea of where the build is at.
Joel


Joel
Szmann
Joined: September 02, 2014
KitMaker: 1,977 posts
Auto Modeler: 1,371 posts
Posted: Monday, December 17, 2018 - 01:10 PM UTC
I don't see the propeller, Joel! Your cockpit looks like an aircraft thing. Cool. I'll check right away the full story on the dedicated thread.
UPDATE - almost there! Almost!
The VW signs added to the rims. I might apply another coat of 2K to protect the decals:

The tires fitted - they need some scuffing and probably some light wash to make the branding visible. Everything is dry fir here, just to get a more complete view:
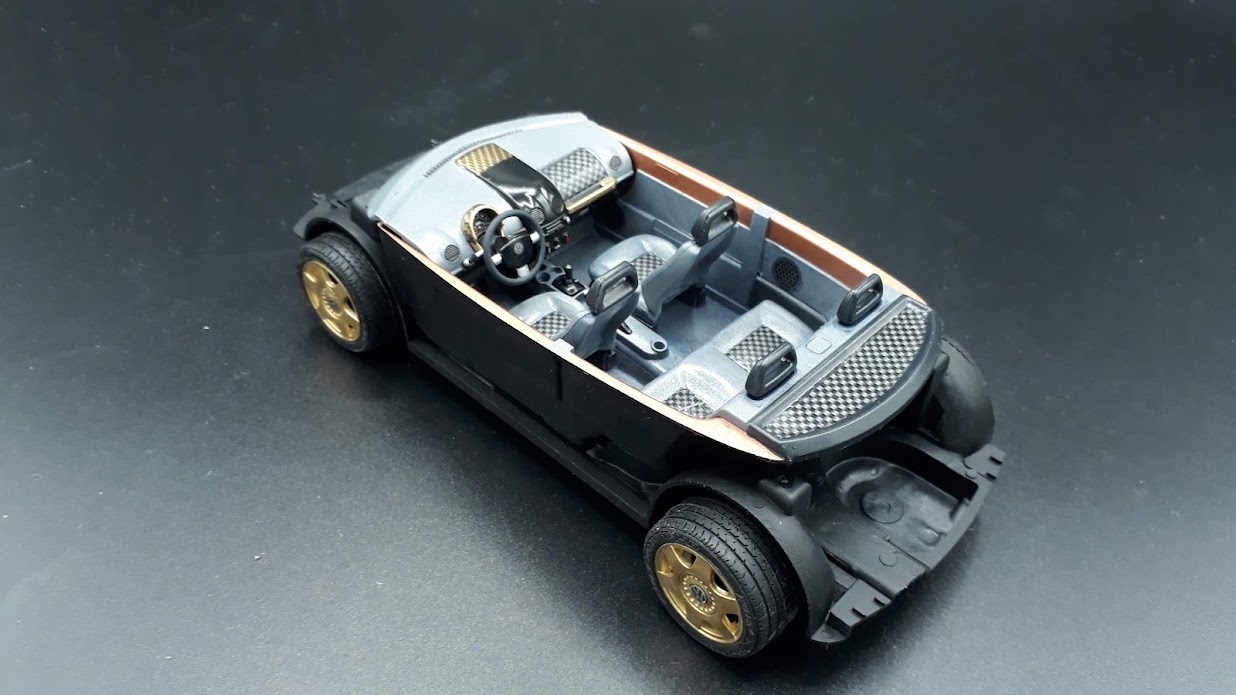
This car is bigger from inside than from outside:

The body almost ready - still waiting for the rear window. The badges were added:

Antenna, the mirrors and the wipers are ready to go, but I don't want to install them before rear window, to prevent breakage:

The rear window was stripped of previous paint and the covering pledge, a new mask was cut from Tamiya masking tape and the edge sprayed again with Tamiya Smoke, this time diluted with MLT. It worked better for me - almost good actually.
Cheers!
Gabriel
UPDATE - almost there! Almost!
The VW signs added to the rims. I might apply another coat of 2K to protect the decals:
The tires fitted - they need some scuffing and probably some light wash to make the branding visible. Everything is dry fir here, just to get a more complete view:
This car is bigger from inside than from outside:
The body almost ready - still waiting for the rear window. The badges were added:
Antenna, the mirrors and the wipers are ready to go, but I don't want to install them before rear window, to prevent breakage:
The rear window was stripped of previous paint and the covering pledge, a new mask was cut from Tamiya masking tape and the edge sprayed again with Tamiya Smoke, this time diluted with MLT. It worked better for me - almost good actually.
Cheers!
Gabriel
 |

WEB HOSTING BY


Copyright ©2021 Auto Modeler and Kitmaker Network, a subsidiary of Silver Star Enterprises
All Rights Reserved. Please read our Conditions of Use and Privacy Policy.
All Rights Reserved. Please read our Conditions of Use and Privacy Policy.