Cars: Muscle Cars
60's & 70's Classics
AMT new tool Chrysler 300C (commissioned)
Szmann
_VISITCOMMUNITY
Netherlands Antilles
Joined: September 02, 2014
KitMaker: 1,977 posts
Auto Modeler: 1,371 posts
Posted: Friday, January 18, 2019 - 02:22 PM UTC
Hi, guys!

I reached today finally to put some color on the shell.

UPDATE

First, for conformity. I've done my best to delete the seam line on the oil filler cap, but I haven't managed to pull it from its place so I couldn't change the color - I re-painted it with the same orange.


The last known issue with the body it was this sink mark:


Painting in progress. Making a short break to re-fill the airbrush, I snapped a picture with the way the car would have looked with a white roof:


Painting complete. For shiny is shiny, but I'n not quite happy with the surface - too many "bumps" from the paint. There is no other cure than the old good elbow grease:


Same story with the hood:


Assembly view of the painted parts:


Cheers!
Gabriel
AussieReg
Staff MemberAssociate Editor
AUTOMODELER
#007
_VISITCOMMUNITY
Victoria, Australia
Joined: June 09, 2009
KitMaker: 8,156 posts
Auto Modeler: 2,953 posts
Posted: Friday, January 18, 2019 - 03:44 PM UTC

Quoted Text

Yes, I know! I even try to taper the blades on another fan. It works for the outer most part, but as the circle narrows, it is impossible to sand down. I just loathe them, but I guess we need to live with


I might be creating a monster, but I'm thinking on my next build I might cut some replacement blades from an old beer can (because I don't drink soda) and see how I go transplanting them onto the kit fan hub.

The body looks great, but which is the true colour to the naked eye? The images in the spray booth look a lot darker, so I would think the last image might be the true colour.

Great job cleaning up that oil cap seam as well, the little things that take a build to the next level!

Cheers, D
Szmann
_VISITCOMMUNITY
Netherlands Antilles
Joined: September 02, 2014
KitMaker: 1,977 posts
Auto Modeler: 1,371 posts
Posted: Friday, January 18, 2019 - 04:15 PM UTC

Quoted Text


I might be creating a monster, but I'm thinking on my next build I might cut some replacement blades from an old beer can (because I don't drink soda) and see how I go transplanting them onto the kit fan hub.

The body looks great, but which is the true colour to the naked eye? The images in the spray booth look a lot darker, so I would think the last image might be the true colour.


Thanks for the kind words, Damian!
It sounds interesting with aluminum sheet as you suggested. I was thinking of styrene sheet, but I didn't see it working because of the curved asymmetrical profile. With aluminum or copper sheet seems more feasible. I'm waiting with maximum interest your experiment!

Yes, your guess is correct: the last picture shows the truer color; the one in the paint booth is altered by mixed light filtered thru the semi-gloss walls of the booth.

Cheers!
Gabriel
Joel_W
Staff MemberAssociate Editor
AUTOMODELER
_VISITCOMMUNITY
New York, United States
Joined: December 04, 2010
KitMaker: 11,666 posts
Auto Modeler: 2,974 posts
Posted: Saturday, January 19, 2019 - 03:00 AM UTC
Gabriel,
The color coat out of the booth looks perfect. Talk about a gloss job. Well done my friend.

As for replacing those fan blades. The Aluminum from a can would certainly work, but be a lot harder to shape then using .020 sheet. I've found that you can shape thin sheet by heating up the handle of a Exacto knife and rolling it till it cools off. The roll isn't major, so the plastic should hold the shape just fine.

Joel
Stickframe
#362
_VISITCOMMUNITY
California, United States
Joined: December 01, 2013
KitMaker: 1,661 posts
Auto Modeler: 431 posts
Posted: Saturday, January 19, 2019 - 09:47 AM UTC
Hi Gabriel,

It’s pleasure to see your work - the motor and body are both looking good!

Regarding the fan, I’ve tried the aluminum can method before and liked the results. I suspect there are lots of ways to do this. I first cut the aluminum into a circle matching the overall fan diameter. Next, I drilled a small hole in the center. Then traced the fan pattern onto the aluminum I wanted and cut it out, followed by slightly twisting the blades. I then cut out two small diameter discs from thin styrene, and drill a small hole in the center. These function as collars - on the front and back of the fan. These are positioned on the fan on a length of thin brass rod. The styrene collars help to stabilize the fan, add some visual bulk, and create a decent mounting surface.

Looking forward to your progress -

Cheers
Nick
Szmann
_VISITCOMMUNITY
Netherlands Antilles
Joined: September 02, 2014
KitMaker: 1,977 posts
Auto Modeler: 1,371 posts
Posted: Saturday, January 19, 2019 - 10:14 AM UTC

Quoted Text

Gabriel,
The color coat out of the booth looks perfect. Talk about a gloss job. Well done my friend.

As for replacing those fan blades. The Aluminum from a can would certainly work, but be a lot harder to shape then using .020 sheet. I've found that you can shape thin sheet by heating up the handle of a Exacto knife and rolling it till it cools off. The roll isn't major, so the plastic should hold the shape just fine.

Joel


Thank you, Joel!
It make sense entirely what you're saying about using heat to shape the aluminum from cans. The last I've worked with (from a Heineken) seemed some sort of laminated plastic rather than aluminum - very thin and very stiff.
I should give it a try.
Thanks for your advice.

Gabriel
Szmann
_VISITCOMMUNITY
Netherlands Antilles
Joined: September 02, 2014
KitMaker: 1,977 posts
Auto Modeler: 1,371 posts
Posted: Saturday, January 19, 2019 - 10:21 AM UTC

Quoted Text

Hi Gabriel,

It’s pleasure to see your work - the motor and body are both looking good!

Regarding the fan, I’ve tried the aluminum can method before and liked the results. I suspect there are lots of ways to do this. I first cut the aluminum into a circle matching the overall fan diameter. Next, I drilled a small hole in the center. Then traced the fan pattern onto the aluminum I wanted and cut it out, followed by slightly twisting the blades. I then cut out two small diameter discs from thin styrene, and drill a small hole in the center. These function as collars - on the front and back of the fan. These are positioned on the fan on a length of thin brass rod. The styrene collars help to stabilize the fan, add some visual bulk, and create a decent mounting surface.

Looking forward to your progress -

Cheers
Nick


Thank you so much, Nick, for your kind words of appreciation and for the advice on the fan. It sounds quite coherent actually. I wonder if I'll be able to slice the fan pulley after cutting off the blades and to sandwich the aluminum blades between slices, to keep the original detail on the pulley, or at least to thin it down from back to front for the same reason.
Obviously I have no guts to try this on a commissioned build, but I'm really getting itchy here...

Cheers!
Gabriel
RussellE
#306
_VISITCOMMUNITY
Victoria, Australia
Joined: June 27, 2010
KitMaker: 3,959 posts
Auto Modeler: 495 posts
Posted: Saturday, January 19, 2019 - 09:09 PM UTC
Gabriel, somehow I missed the start of your build (I guess holiday season can do that) But I'm all caught up now!

Excellent progress so far!

Can I ask: What did you use for the spark plug leads?
Szmann
_VISITCOMMUNITY
Netherlands Antilles
Joined: September 02, 2014
KitMaker: 1,977 posts
Auto Modeler: 1,371 posts
Posted: Saturday, January 19, 2019 - 11:42 PM UTC

Quoted Text

Gabriel, somehow I missed the start of your build (I guess holiday season can do that) But I'm all caught up now!

Excellent progress so far!

Can I ask: What did you use for the spark plug leads?


Russ, thanks for checking in. No worries, a camping trip with the family shall not be missed; my build blog will wait here until you have the time and the mood to read it

Yes, the build is going quite smooth so far - with really minimal issues.

I'm always glad to share my experiences: the ignition wires were made out of stretched sprue, painted over with black craft acrylic paint.

Cheers!
Gabriel
Hwa-Rang
_VISITCOMMUNITY
Kobenhavn, Denmark
Joined: June 29, 2004
KitMaker: 6,760 posts
Auto Modeler: 2,182 posts
Posted: Sunday, January 20, 2019 - 01:55 AM UTC
Killer paintjob Gabriel.
AussieReg
Staff MemberAssociate Editor
AUTOMODELER
#007
_VISITCOMMUNITY
Victoria, Australia
Joined: June 09, 2009
KitMaker: 8,156 posts
Auto Modeler: 2,953 posts
Posted: Sunday, January 20, 2019 - 02:36 AM UTC

Quoted Text

I wonder if I'll be able to slice the fan pulley after cutting off the blades and to sandwich the aluminum blades between slices, to keep the original detail on the pulley, or at least to thin it down from back to front for the same reason.


That is exactly what I was planning to try out as well. I also like Nick's approach, sounds straightforward and relatively easy. I see some experimenting in the near future, best I have a couple of beers to stock up on raw materials

Cheers, D
Szmann
_VISITCOMMUNITY
Netherlands Antilles
Joined: September 02, 2014
KitMaker: 1,977 posts
Auto Modeler: 1,371 posts
Posted: Sunday, January 20, 2019 - 11:27 AM UTC

Quoted Text

Killer paintjob Gabriel.


Thanks, Jesper!
I just checked the paint on the body: it is dry to touch and retained much of the gloss, but still emanates a strong odor of thinner / oil - perhaps the de-gassing isn't done yet. No rush, I have things to keep me busy

Cheers!
Gabriel
Szmann
_VISITCOMMUNITY
Netherlands Antilles
Joined: September 02, 2014
KitMaker: 1,977 posts
Auto Modeler: 1,371 posts
Posted: Sunday, January 20, 2019 - 11:32 AM UTC

Quoted Text


Quoted Text

I wonder if I'll be able to slice the fan pulley after cutting off the blades and to sandwich the aluminum blades between slices, to keep the original detail on the pulley, or at least to thin it down from back to front for the same reason.


That is exactly what I was planning to try out as well. I also like Nick's approach, sounds straightforward and relatively easy. I see some experimenting in the near future, best I have a couple of beers to stock up on raw materials

Cheers, D


I agree, it looks like a feasible solution. I cannot wait to try it myself in the next build - Ford 1920 Roadster, also from AMT. Fortunately on this case, the fan has only two blades. Unfortunately, it is molded together with the belt. I'll see how it goes.

Cheers!
Gabriel
AussieReg
Staff MemberAssociate Editor
AUTOMODELER
#007
_VISITCOMMUNITY
Victoria, Australia
Joined: June 09, 2009
KitMaker: 8,156 posts
Auto Modeler: 2,953 posts
Posted: Sunday, January 20, 2019 - 12:01 PM UTC

Quoted Text

I agree, it looks like a feasible solution. I cannot wait to try it myself in the next build - Ford 1920 Roadster, also from AMT. Fortunately on this case, the fan has only two blades. Unfortunately, it is molded together with the belt. I'll see how it goes.


I have been going over the process in my head, thinking about how to replicate the ridge details in the fan blades. Gluing a half round piece of Evergreen perhaps? I'm also considering pressing the blade down over a drill bit and "burnishing" with a toothpick might be an answer. Hmmmmmmm . . . .

Cheers, D
Szmann
_VISITCOMMUNITY
Netherlands Antilles
Joined: September 02, 2014
KitMaker: 1,977 posts
Auto Modeler: 1,371 posts
Posted: Sunday, January 20, 2019 - 12:03 PM UTC
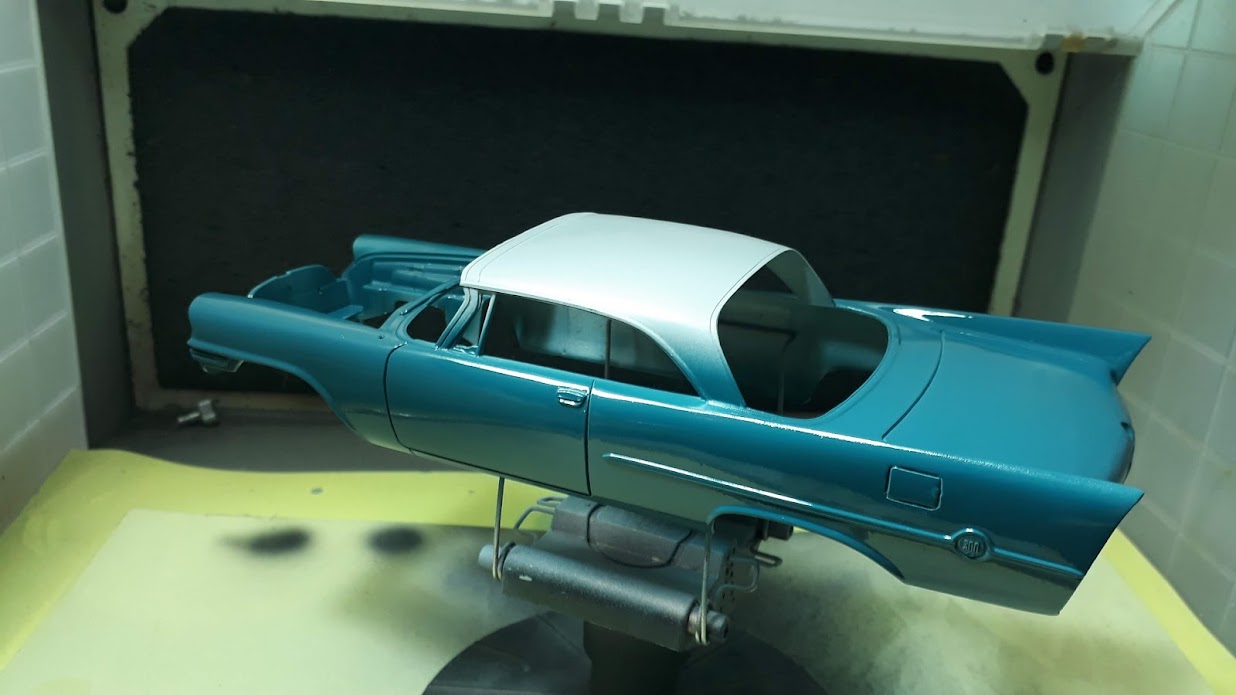
UPDATE - where are them lines going? (Caribbean "English")

First off, I had yesterday a lengthy conversation with Luigi, the owner of the Chrysler about some details. We disagreed about the color on the outside of the bottom pan. I wanted it body color, he wants it semi-gloss black. I pleaded that black of the chassis frame on black of the bottom pan will absorb all detailing - he still wants it black. Eventually he conceded that I should do the chassis gloss black and the bottom pan semi-gloss black.
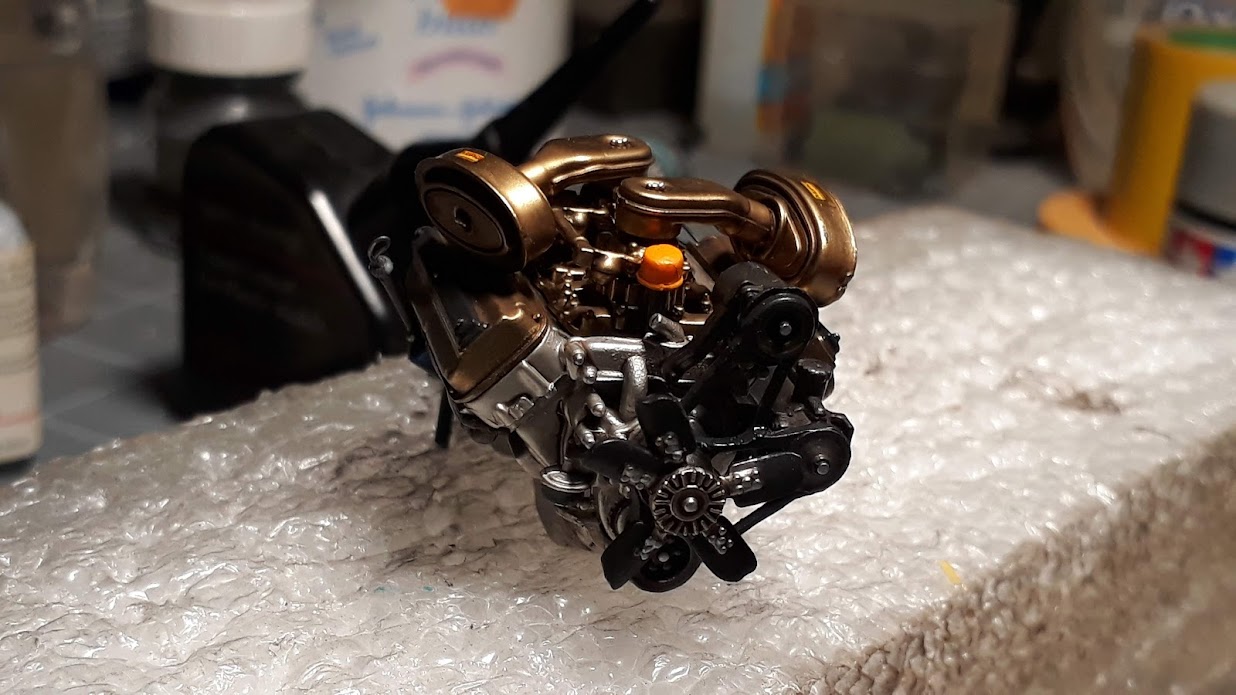
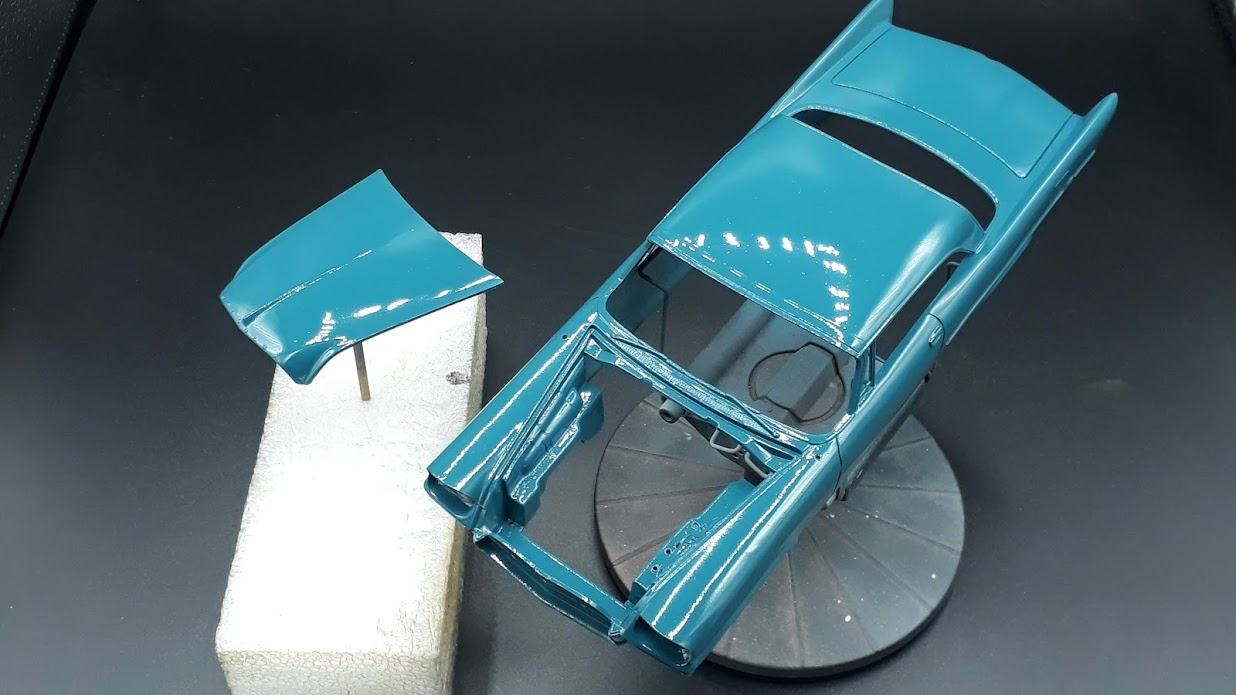
Another discussion was centered around the brake lines. I wanted to make them, he says it doesn't matter, they're not going to be seen anyhow. Then I observed on the differential axles that the brake lines are actually molded there (quite soft, but they are present). That tipped the balance in my favor, but actually put me in trouble because I don't know how they suppose to reach from the brake booster to the differential cassette. Can anyone please help with the issue, based on the following photos? Thanks!

The chassis is very nicely done, although (again!) were some trouble with fitting the tie rod. I dare say the detailing on suspension / direction / transmission it is above Tamiya - at least for the kits I was working on myself:


The shape of the tie rod isn't all that good, being more shallower than needed to bypass the torsion bars. The result is an increased length, that pushes the wheel axles in a cross-eyed position. The solution was to glue one end in place, wait for it to dry, then forced it to the correct bend and glue the other end as well:


The rear end suspension / transmission is rather simple and all went smooth, except for a locator pin that was off the mark, twisting the right side lamellar spring around its longitudinal axle. Fixed it by melting the troublesome pin with Testors glue and forcing it to the right angle:


I could have gone ahead and painted the chassis, but I wanted to glue first the clamps for brake lines, which I don't know where they go

I used the little time left to paint the white inserts of the tires with gloss Rust-oleum almond to make them more antique. Here you can see them in comparison with the original sprue white:


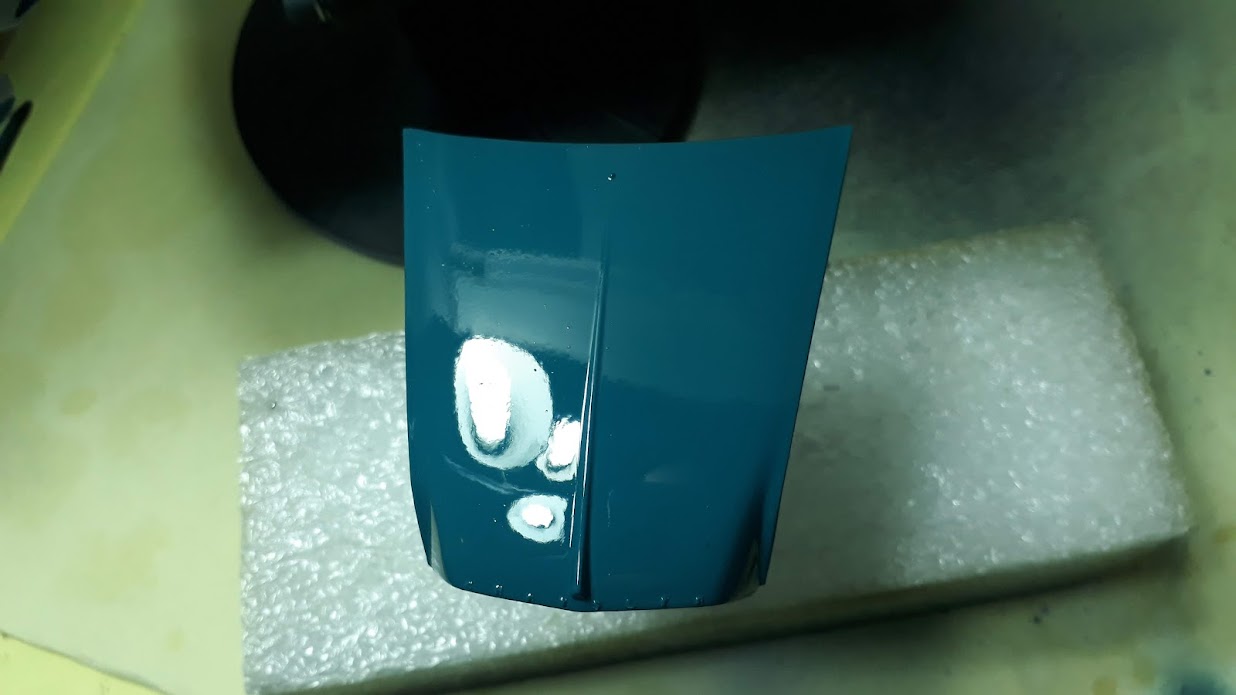
In this picture you can see them next to a spoon painted on body color - and I think they look much better than they have looked in "pure white":


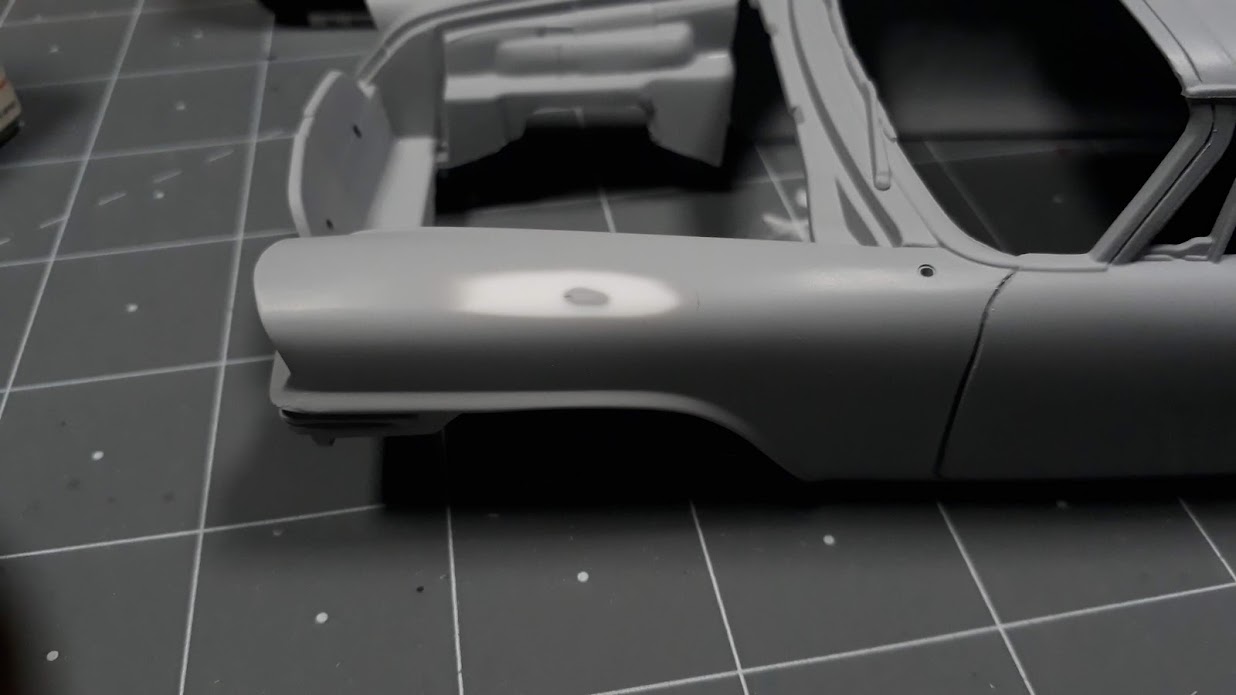
The chrome parts have to be re-chromed because the exposed plastic from the cuts can be seen. Ialso I have noticed some scratches on the front fender. I will polish the problematic areas, then I will spray Alclad II chrome right over; I'm still thinking if I should apply a coat of polyurethane or 2K after Alclad, but I'm more tempted by the polyurethane because its yellowish tinge. Any suggestions?

I will really appreciate if anyone could help me with the line brakes!

Thanks for following!
Cheers!
Gabriel
RussellE
#306
_VISITCOMMUNITY
Victoria, Australia
Joined: June 27, 2010
KitMaker: 3,959 posts
Auto Modeler: 495 posts
Posted: Sunday, January 20, 2019 - 10:42 PM UTC
Gabriel, this is really an amazing build!

Thanks for the tip about the spark plugs! Will use than on my Trans Am that's been on the bench the last four years

Am no expert on the brake lines, but if the owner doesn't want them, I'd sure be tempted to omit them
Joel_W
Staff MemberAssociate Editor
AUTOMODELER
_VISITCOMMUNITY
New York, United States
Joined: December 04, 2010
KitMaker: 11,666 posts
Auto Modeler: 2,974 posts
Posted: Monday, January 21, 2019 - 04:06 AM UTC
Gabriel,
I have a hard time remembering yesterday, but going back to the 1960s is a real challenge for sure.

From what I can remember, the engine oil pan was always painted the same color as the engine block. The real hard question was what color. Chrysler unlike Ford or GM used different colors for different engines. Hemis and race Hemis were treated differently color wise, and were mostly Orange. The colors used for various other blocks did vary by year and or engine type.

During the 1960s the general used color was a darkish Blue. I Googled it to find out exactly what color Blue, but for the most part no one seems to know. What was interesting is that the Blue had a tendency to turn more towards a Turquoise color due to heat, but to the naked eye, with all the dirt, and grime from road use, it's pretty hard to tell. Since you're doing a mint build with no miles on it, the color would be darker then your body color. As for the Black, well, like I said, from more google searchers, it depends on the year right through the 1980s. But Black is wrong for your build.

The issue with the steering Tie rod is because the Idler Arms are angled incorrectly. Not sure if you could have tweaked the angle some to cure the problem or not.

As for the clips for the rear brake lines, I haven't a clue. Usually they were two on each side. the outer one was always just before where the line attached to the axel casing had a fitting for the brake fluid hose so that it was flexible to move up and down with the shocks/springs. the other clamp was usually more to the rear end, but like I said, the few times I saw one, I just don't remember.

Hope this helps.

Joel


Szmann
_VISITCOMMUNITY
Netherlands Antilles
Joined: September 02, 2014
KitMaker: 1,977 posts
Auto Modeler: 1,371 posts
Posted: Monday, January 21, 2019 - 02:42 PM UTC

Quoted Text


I have been going over the process in my head, thinking about how to replicate the ridge details in the fan blades. Gluing a half round piece of Evergreen perhaps? I'm also considering pressing the blade down over a drill bit and "burnishing" with a toothpick might be an answer. Hmmmmmmm . . . .

Cheers, D


Sorry, D., somehow I've missed this post. Yes, you're right. I've seen some guy on YT doing the ribs on a PE part with a ballpoint pen over an eraser. Something between burnishing and scribing. Perhaps if it works on PE, it should be working on can aluminum as well.

Cheers!
Gabriel
Szmann
_VISITCOMMUNITY
Netherlands Antilles
Joined: September 02, 2014
KitMaker: 1,977 posts
Auto Modeler: 1,371 posts
Posted: Monday, January 21, 2019 - 02:49 PM UTC

Quoted Text

Gabriel, this is really an amazing build!

Thanks for the tip about the spark plugs! Will use than on my Trans Am that's been on the bench the last four years

Am no expert on the brake lines, but if the owner doesn't want them, I'd sure be tempted to omit them


Thanks, Russ!

Yes, I find working with stretched sprue more convenient because can be easily glued with your regular Tamiya extra thin and can be painted with acrylics. I won't recommend painting them with lacquers (or solvent based acrylics) because the solvent will soften them to the breaking point.

And you're correct again! The sensible thing to do is to follow the owners advice, especially if simplifies the work.

Cheers!
Gabriel
Szmann
_VISITCOMMUNITY
Netherlands Antilles
Joined: September 02, 2014
KitMaker: 1,977 posts
Auto Modeler: 1,371 posts
Posted: Monday, January 21, 2019 - 02:55 PM UTC

Quoted Text

Gabriel,
I have a hard time remembering yesterday, but going back to the 1960s is a real challenge for sure.

From what I can remember, the engine oil pan was always painted the same color as the engine block. The real hard question was what color. Chrysler unlike Ford or GM used different colors for different engines. Hemis and race Hemis were treated differently color wise, and were mostly Orange. The colors used for various other blocks did vary by year and or engine type.

During the 1960s the general used color was a darkish Blue. I Googled it to find out exactly what color Blue, but for the most part no one seems to know. What was interesting is that the Blue had a tendency to turn more towards a Turquoise color due to heat, but to the naked eye, with all the dirt, and grime from road use, it's pretty hard to tell. Since you're doing a mint build with no miles on it, the color would be darker then your body color. As for the Black, well, like I said, from more google searchers, it depends on the year right through the 1980s. But Black is wrong for your build.

The issue with the steering Tie rod is because the Idler Arms are angled incorrectly. Not sure if you could have tweaked the angle some to cure the problem or not.

As for the clips for the rear brake lines, I haven't a clue. Usually they were two on each side. the outer one was always just before where the line attached to the axel casing had a fitting for the brake fluid hose so that it was flexible to move up and down with the shocks/springs. the other clamp was usually more to the rear end, but like I said, the few times I saw one, I just don't remember.

Hope this helps.

Joel


It does help, Joel, thank you very much. I won't use the info on this build, because I decided to do as the owner asks, since he's the one who pays for the trouble. But I have in my stash Chrysler 300B from Moebius, which isn't gonna run without brake lines

Thank so much for again for generously using your little time for helping me with my research.

Gabriel
Szmann
_VISITCOMMUNITY
Netherlands Antilles
Joined: September 02, 2014
KitMaker: 1,977 posts
Auto Modeler: 1,371 posts
Posted: Monday, January 21, 2019 - 03:10 PM UTC
UPDATE - Cheating on my employer

So: I decided to stop being a troublesome hothead and do as the owner wants. Black on black he wants, black on black we do. The thing is he didn't specified which black , other than gloss / semi-gloss. It occurred to me that I can use two "blacks" just to ad some diversity and to make the detail visible, without altering too much the outcome.
Furthermore, I sprayed the frame with gloss "black" in which I added some panzer gray purple hue, achieving something very close to a color very familiar to aircraft builders (Germany). For the floor pan I'm going to add just a little yellow to black, to make it steer towards olive drab (or Tamiya's Nato Black). Purple and yellow are almost opposite on the chromatic circle and I should achieve a hue contrast, if not a tonal one. Let's see what is going to be:


I also painted all other sub-assemblies belonging to under-frame but I don't really like what I've got, so I'm going to redo the exhaust pipes at least. The shocks I paint them with Alclad II chrome, followed by Tru-color Paint Blue Cobalt Candy. It is the first time I use this paint and I was pleasantly surprised with the way it came out. Definitely I need to look deeper into its capabilities:


Cheers!
Gabriel
Joel_W
Staff MemberAssociate Editor
AUTOMODELER
_VISITCOMMUNITY
New York, United States
Joined: December 04, 2010
KitMaker: 11,666 posts
Auto Modeler: 2,974 posts
Posted: Tuesday, January 22, 2019 - 06:47 AM UTC
Gabriel,
Great decision, as the customer is always right. You can win the battle, but you'll always loose the war with no customers.

Love how those shocks came out. So much so that I'm going to get some of that True Color Cobalt Blue Candy paint.

Joel
Hwa-Rang
_VISITCOMMUNITY
Kobenhavn, Denmark
Joined: June 29, 2004
KitMaker: 6,760 posts
Auto Modeler: 2,182 posts
Posted: Tuesday, January 22, 2019 - 06:18 PM UTC

Quoted Text

Black on black he wants, black on black we do. The thing is he didn't specified which black


Gabriel, you cheeky devil
Looks great.
Szmann
_VISITCOMMUNITY
Netherlands Antilles
Joined: September 02, 2014
KitMaker: 1,977 posts
Auto Modeler: 1,371 posts
Posted: Wednesday, January 23, 2019 - 12:10 AM UTC

Quoted Text

Gabriel,
Great decision, as the customer is always right. You can win the battle, but you'll always loose the war with no customers.

Love how those shocks came out. So much so that I'm going to get some of that True Color Cobalt Blue Candy paint.

Joel


Thanks for support, Joel!

I really like these TCP paints, with minor exceptions. This cobalt blue looks very interesting over metallic, that's for sure. Although is a "candy" color, covers very well, much better than Tamiya transparent colors (smoke included). And how you use bigger a/b settings, there is no need for thinning. I'm looking myself for the opportunity to use the Cobalt Candy on a wider area.
P.S. TCP are solvent based acrylics. They behave virtually like lacquers, with easiness to sand as bonus.

Gabriel
Szmann
_VISITCOMMUNITY
Netherlands Antilles
Joined: September 02, 2014
KitMaker: 1,977 posts
Auto Modeler: 1,371 posts
Posted: Wednesday, January 23, 2019 - 12:18 AM UTC

Quoted Text


Quoted Text

Black on black he wants, black on black we do. The thing is he didn't specified which black


Gabriel, you cheeky devil
Looks great.


Thank you, Jesper. I just couldn't stand to lose all that fine detail of the frame in a "black hole". I'm about to detail it by brush and add the engine to it.

Cheers!
Gabriel